
 10-08-2015, 01:47 PM
Last edit by: IB Advertising
See related guides and technical advice from our community experts:
Browse all: Repair and Maintenance
- Ford Mustang Gt 1996 to 2004: How to Replace Wheel Hub and Bearing
Step by step instructions for do-it-yourself repairs
Browse all: Repair and Maintenance

How to: Replace Front Wheel Bearing/Hub Assembly
05-08-2012, 10:15 PM
#1
2nd Gear Member
Thread Starter
Join Date: May 2009
Location: New York
Posts: 476
Start by jacking up the car until one, or both, of the front wheels are off the ground. If you face the wheel, grab the top and bottom of the tire and try and rock the wheel forward and back. If there is any play, it's time to replace the wheel hub assembly (A loud noise/vibration that varies in loudness when turning is also a symptom). This hub assembly includes the wheel bearing, studs, and ABS ring. Both sides should be replaced at the same time.
Estimated Time: 2 hours
Tools:
- Breaker Bar (I used a 24" bar)
- Torque Wrench (Which needs to reach ~258 lb/ft)
- 36mm socket (Most likely this will be a 1/2" sized socket, so buy your breaker bar and torque wrench to fit)
- 15mm socket
- Jack/Jack Stands
- Rubber Mallet/Hammer
- C-Clamp

Materials:
- Hub Assembly
- Dust Cover
- Axle Nut
- PB Blaster
- Wire
- Grease/Anti-seize
Step 1. Jack up car and place jack stands underneath.
Step 2. Remove wheel.
Step 3. Spray caliper bolts with PB Blaster and let soak for 15 min.

Step 4. If necessary, use the breaker bar and 15mm socket to break the brake caliper bolts loose (This may be a tight fit with the breaker bar!). Turning the wheel will provide better access with the breaker bar.

Step 5. Remove brake caliper and hang with wire to avoid stress on the brake lines/connections.
Step 6. Remove the rotor. If necessary, use a rubber mallet and hammer it off (turn the rotor 1/4 times for each strike).
Step 7. Remove dust cover from old hub assembly.
Step 8. Use breaker bar and 36mm socket to take off old axle nut. Discard old axle nut.
Step 9. Remove old hub assembly.
Step 10. Clean all debris and rust from wheel spindle.
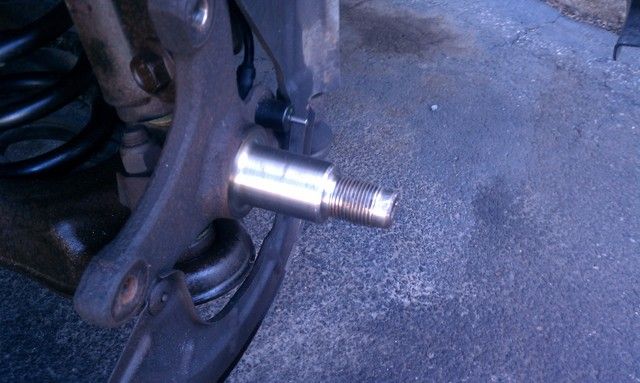
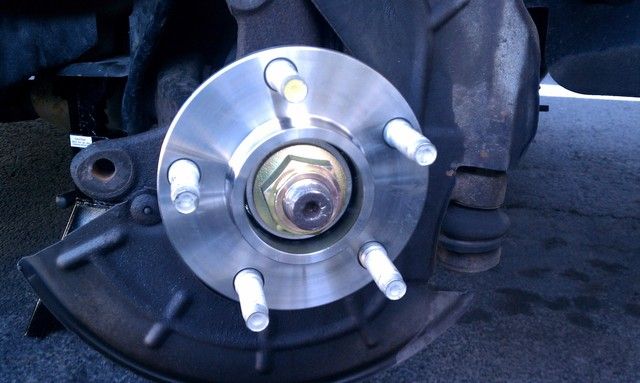
Step 11. Put new hub assembly on wheel spindle.
Step 12. Tighten new axle nut to 258 ft/lb.

Step 13. Install new dust cover. Rubber mallet will be useful here as well, be careful not to dent/damage the new cover.
Step 14. Reinstall rotor, a small bit of grease on the rear of the rotor will help future removal.
Step 15. If the brake caliper will not slide back over rotor, use the c-clamp and depress the brake caliper pistons slightly.
Step 16. Reinstall brake caliper bracket bolts, torque to 85 ft/lb. Anti-seize compound (different from the previously used grease on the rotors) may be useful here as well.

Step 17. Reinstall tire, remove jack stands, and lower car.

Step 18. Repeat for the other side.
Step 19. Enjoy, you're done!
Estimated Time: 2 hours
Tools:
- Breaker Bar (I used a 24" bar)
- Torque Wrench (Which needs to reach ~258 lb/ft)
- 36mm socket (Most likely this will be a 1/2" sized socket, so buy your breaker bar and torque wrench to fit)
- 15mm socket
- Jack/Jack Stands
- Rubber Mallet/Hammer
- C-Clamp
Materials:
- Hub Assembly
- Dust Cover
- Axle Nut
- PB Blaster
- Wire
- Grease/Anti-seize
Step 1. Jack up car and place jack stands underneath.
Step 2. Remove wheel.
Step 3. Spray caliper bolts with PB Blaster and let soak for 15 min.
Step 4. If necessary, use the breaker bar and 15mm socket to break the brake caliper bolts loose (This may be a tight fit with the breaker bar!). Turning the wheel will provide better access with the breaker bar.
Step 5. Remove brake caliper and hang with wire to avoid stress on the brake lines/connections.
Step 6. Remove the rotor. If necessary, use a rubber mallet and hammer it off (turn the rotor 1/4 times for each strike).
Step 7. Remove dust cover from old hub assembly.
Step 8. Use breaker bar and 36mm socket to take off old axle nut. Discard old axle nut.
Step 9. Remove old hub assembly.
Step 10. Clean all debris and rust from wheel spindle.
Step 11. Put new hub assembly on wheel spindle.
Step 12. Tighten new axle nut to 258 ft/lb.
Step 13. Install new dust cover. Rubber mallet will be useful here as well, be careful not to dent/damage the new cover.
Step 14. Reinstall rotor, a small bit of grease on the rear of the rotor will help future removal.
Step 15. If the brake caliper will not slide back over rotor, use the c-clamp and depress the brake caliper pistons slightly.
Step 16. Reinstall brake caliper bracket bolts, torque to 85 ft/lb. Anti-seize compound (different from the previously used grease on the rotors) may be useful here as well.
Step 17. Reinstall tire, remove jack stands, and lower car.
Step 18. Repeat for the other side.
Step 19. Enjoy, you're done!
Last edited by Syracuse315; 05-09-2012 at 02:40 PM.
 05-09-2012, 12:06 PM
#2
Great write up! and future readers Make sure you torque that nut if you do not have a torque wrench you can rent one (for free) at most chain auto parts stores. Make sure you get the bigger one becasue most standard torque wrenches do not go up to 258 ft.lbs
06-08-2015, 03:24 PM
#4
Join Date: Jun 2015
Location: Ontario
Posts: 8
I've tried every dealer in the area for the Spindle Nut no one has it around Toronto Canada. And its not a cheap part here. I don't get why Ford would put an nut on there that has to be replace when you do a Wheel bearing job but not stock it at the dealers.
06-08-2015, 05:04 PM
#5
1st Gear Member
Join Date: Feb 2012
Location: Alberta
Posts: 61
you can re use the cover too just dont damage it when you remove it

Thread
Thread Starter
Forum
Replies
Last Post
CMcNam
4.6L V8 Technical Discussions
17
10-30-2022 11:40 PM
MustangForums Editor
Mustang News, Concepts, Rumors & Discussion
1
08-24-2015 01:54 PM
inyadreems
Archive - Mustangs For Sale
2
08-21-2015 09:10 AM