
DIY Brake Cooling Duct Fabrication - Revisited


Thread Starter
2nd Gear Member
Joined: Jul 2005
Posts: 171
From: Seattle, WA
First of all, I'd like to thank Philostang for his invaluable thread on the subject which you can find here.
Basically this is an addition to Philostang's thread with in form of my notes and variations.
Fiberglass inlets.
1. I made the opening a bit smaller than Philostang in order to to keep two out of four mounting tabs in the grille. I think the opening area is still at least twice as big as 3" hose section area this way.
1.I took off the whole bumper shell to use it as a mold base. It's incredible how fast you can take it off. It allowed me to shape the inlets precisely where i wanted them relative to the bumper.
2. I made the forms from blue insulation sheathing. You can glue together the flat pieces together with a spray glue (I used 3M super 77 from Walmart).
3. I fabricated a styrofoam cutter from some plywood and heater coil wire and used it to cut out the basic shape. I sanded it down then with a drywall sanding screen to get the proper shape
4. I used a packing tape to cover the foam and get the smooth surface. You can shrink it with a heat gun to get rid of the wrinkles. One note though: it wrinkled back under resin thinners. Some trial and error is needed to find a tape which wouldn't wrinkle when exposed to styrene (that's the thinner used for resins I believe). You don't need the release agent on top of it if you do the trick with acetone (point 7)
5. It's good to prepare a lot of 8-10x3-4" strips of glass cloth to make the work much easier. I ended up putting around 5 layers of glass and got really stiff elements so it is probably a bit overkill.
6. Cover your skin and keep the place clean when you sand the fiberglass! I got really 'itchy' for two days.
7. Pour some acetone on the foam in order to remove it from the mold. It'll melts quickly and flows out.
Cooling duct.
1. I think that 3" hose is maximum you want to try to install. I experienced some issues with the tire and the suspension moving parts clearance.
2. I fabricated hose brackets from pieces of 3" exhaust pipe which I attached to the front stabilizer. It keeps the hose from moving where it's very close to the tire.
2. I had a problem with the hose rubbing against suspension. This hose is not only expensive but also very fragile and rubs through very quickly. I bought some large diameter heat shrink tube from mouser.com (not cheap either) to protect the hose. It worked perfectly.
Splash shields.
I decided to fabricate my own from scratch and mimic the ones from steeda. They look cool but it took me three days to make them!
Here are some pics:
3rd Gear Member
Joined: Jan 2006
Posts: 757
From: Chicago
Outstanding!
Since doing mine I've wanted to do them again, using what I learned the first time through to do a better job. Never got around to it, because the first set work and I have other priorities. Anyway, I'm glad you posted your work, because this is definitely the way to do it.
Let us know if you find a more suitable tape. I've seen some guys just brush on a thin layer of resin onto their foam buck, wax that a few times and just go from there. I haven't tried it yet. I like the acetone idea though, saves time.
I haven't had any trouble with my hoses rubbing on the tires. This is the best shot of the routing I have.
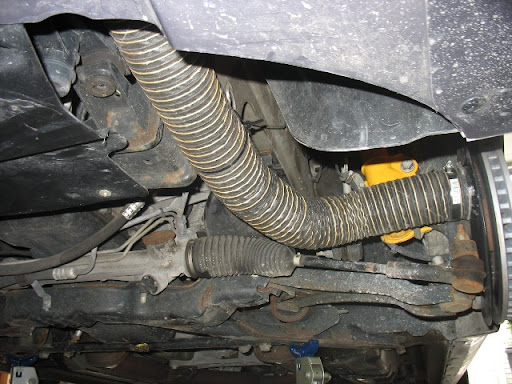
It's not great, but you can see it runs straight down the frame horn, along side the sway bar, and into the modified dust shield.
I hope your post encourages more folks to try their hand at a bit of light fabricating. You've gotten me fired up again...there's a splitter and rear diffuser that have been back-burnered for some time now...
Well done!
Best,
-j
Since doing mine I've wanted to do them again, using what I learned the first time through to do a better job. Never got around to it, because the first set work and I have other priorities. Anyway, I'm glad you posted your work, because this is definitely the way to do it.
Let us know if you find a more suitable tape. I've seen some guys just brush on a thin layer of resin onto their foam buck, wax that a few times and just go from there. I haven't tried it yet. I like the acetone idea though, saves time.
I haven't had any trouble with my hoses rubbing on the tires. This is the best shot of the routing I have.
It's not great, but you can see it runs straight down the frame horn, along side the sway bar, and into the modified dust shield.
I hope your post encourages more folks to try their hand at a bit of light fabricating. You've gotten me fired up again...there's a splitter and rear diffuser that have been back-burnered for some time now...
Well done!
Best,
-j
3rd Gear Member
Joined: Jan 2006
Posts: 757
From: Chicago
Hmmm, just saw your pic of the hose routing. Wonder why you got rubbing there?
Anyway, for other folks interests, I also noticed you got an outlet with an oval tube. Good choice. I've since learned that this is a preferred design. The idea is that it funnels all the air through the hub of the rotor where it evenly cools it down. The round style outlet (like mine) has a tendency to send most air through the hub but some air over the inside face of the rotor. This results in cooling that side more than the outside.
I noticed this when I first made mine, but I didn't put things together in my head in time ("Why was I seeing those oval outlets...?"). Doing it again, I'd go oval. That said, I don't think the differential cooling is extreme or terribly detrimental to my rotors; it's just not ideal.
Last word, I do recall wrapping up some areas of the hose to prevent rub through along the hanging points (I just have it zip tied up at the frame). I went cheap and used a couple of layers of black duct tape. They've held up fine.
Best,
-j
Thread Starter
2nd Gear Member
Joined: Jul 2005
Posts: 171
From: Seattle, WA
I'm glad to hear you like my job! It's your design after all.
Actually I didn't have any rubbing against the tire because I went straight to the solution with the bracket on the swaybar. It stabilizes the hose very well.
Where I had the rubbing though was against the steering linkage, the swaybar and zip ties. I had to repair the hose in couple spots.
I used the duct tape initially (Gorilla seems to be the most durable), but I wanted an ultimate solution. Heat shrink tube is nice because in 4" diameter it is quite thick and it hardens after shrinking, forming a rigid shell around the hose (don't overdo it though because the hose can turn into a plastic pipe).
I went with oval pipes because I read in some book to avoid forcing air on the inner side of the rotor. I have to admit it took a lot of time to massage the 3" pipe to fit between the inner edge of the rotor and the ABS sensor.
One note on the pipe. I ended up buying the 3" and cutting out a part of it to get to smaller diameter. 2.75" seemed to be too loose fit for me and 3" ended up being too tight.

Thread
Thread Starter
Forum
Replies
Last Post
Matt's 95 Stang
5.0L (1979-1995) Mustang
2
Oct 5, 2015 07:16 AM
MustangForums Editor
General Tech
0
Sep 25, 2015 06:42 PM