Junkyard/DIY perfomance 2
 09-21-2006, 02:32 AM
#1
5th Gear Member
Thread Starter
Join Date: Jul 2003
Location: United States
Posts: 3,451
I've been told this thread will remain a sticky as long as no one posts ANYTHING other than upgrades THAT INCLUDES QUESTIONS. This is for upgrades not questions on whether something will fit or not, that is the 5.0 section of the forum. This is for people that can't afford the expensive parts, the cheap route to hp
& plz don't post something you THINK might be right double check to make sure to avoid confusion
Link to the old thread: https://mustangforums.com/m_383314/mpage_1/key_/tm.htm
If you have an upgrade in mind post it like this (Quoated from Bad Karma)
Intakes:
yada yada yada
Brake parts/upgrade:
yada yada yada
Radiator Upgrade:
yada yada yada
Axles:
yada yada yada
__________________________________________________ _________________________
Fuel pressure gauge
You can get a 0-100 pressure gauge from lowes for $7 then drill & tap a hole in your fuel rail rather than paying $40
__________________________________________________ _________________________
Electric fan
Mark VIII & SN95 Fans are VERY good flowing replacement fans for OE crank driven fans. V70, S60 , S80, S70, Volvo fans are a good replacement fan, awesome cooling & very cheap. They are electric & flow alot of air. They can be made to fit very easily.
The downside is you may need to upgrade your alt. There are some people getting away with still using the 75 amp alternator, but I switched mine with a 140amp alt. Here is a link to help you out.
http://www.fordmuscle.com/archives/2...cfan/index.php
__________________________________________________ _________________________
Alternator upgrade
You can swap the stock 75 amp alt in the 87-93 mustangs with the 94-95 GT 130 amp alt. You'll have to grind a bit of the bracket away (not a problem, the bracket is made of aluminum) but it's well worth it. Here is a link that helps give you a view of what's required, but I had to grind my bracket different than they did.
http://www.mustangcentral.net/tech/alternator.html
__________________________________________________ _________________________
Junkyard Twin Turbo
This one I'd only recommend to experienced people or if you have a friend that weld/cut metal. It's not hard to do, but is very time consuming especially if it's your first time. & it is important you upgrade the fuel system
http://www.toohighpsi.com/Ericmustang/TT302.htm
__________________________________________________ _________________________
Starter upgrade
The 91 & below year mustang starters can be replaced with the ligher more efficient units on 92+ 5.0 mustangs.
__________________________________________________ _________________________
Intake Manifold
The Ford Explorer intake manifold from a 95+ 5.0L flows alot better than the stock manifold if you can find one from a junk yard. Although harder to find if you can get a 94-95 cobra manifold.
http://www.geocities.com/blackninetylx/Explorer.html
 09-28-2006, 03:53 AM
#2
5th Gear Member

Join Date: Mar 2006
Location: Greenville SC
Posts: 2,317
If you dont mind looks, when you get to the track and you've got your set of slicks on your spare rims on the back, throw two spare tire doughnuts on the front of your stang for a 'junkyard' set of skinnies up front.
 09-29-2006, 02:17 AM
#4
5th Gear Member
Thread Starter
Join Date: Jul 2003
Location: United States
Posts: 3,451
ORIGINAL: PJB
Will the track actually let you do that though? It might not pass tech due to the 45 mph limit (or whatever it is) on temporary spare tires.
Will the track actually let you do that though? It might not pass tech due to the 45 mph limit (or whatever it is) on temporary spare tires.
ORIGINAL: FoxGT
I've been told this thread will remain a sticky as long as no one posts ANYTHING other than upgrades THAT INCLUDES QUESTIONS. This is for upgrades not questions on whether something will fit or not, that is the 5.0 section of the forum.
I've been told this thread will remain a sticky as long as no one posts ANYTHING other than upgrades THAT INCLUDES QUESTIONS. This is for upgrades not questions on whether something will fit or not, that is the 5.0 section of the forum.
5 lug conversion(not all wheel disk brakes)
you need two driver axels out a 83-92 ranger & the drums. & a pair of rotors from a late 80's Mark VII
(info from Liquid_02)
Here is a page that goes more in depth with it.
http://www.stangnet.com/tech/lug.html
10-24-2006, 10:54 PM
#5
5th Gear Member
Thread Starter
Join Date: Jul 2003
Location: United States
Posts: 3,451
DIY 12V key on source
If you need a supply for all those gauges you have or perhaps something else, here is a guide to how to make a terminal block for it so you don't have to keep splicing wires. I included a diagram to help with how to install one.
The idea came from: http://www.fordmuscle.com/archives/2...eyOn/index.php
Most people won't have access to the 2nd page with the wiring diagram. I am one of those people. So i've drawn one up for those of you who don't know much about electrical.
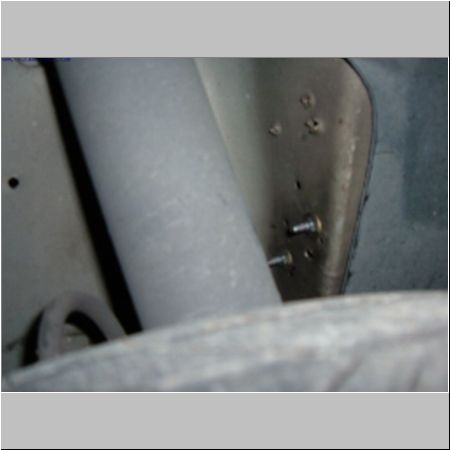
When you connect an item to one of the terminals, the ground must go to part of the frame, no need to run it all the way back to your battery, any good part of the frame will do. A good choice would be a bolt or screw that holds a bracket onto the frame.
If you have any more ?'s on it pm me & i'll try to edit the post to make it more helpful to keep this thread clean. Here is the original thread
https://mustangforums.com/m_2153436/tm.htm

If you need a supply for all those gauges you have or perhaps something else, here is a guide to how to make a terminal block for it so you don't have to keep splicing wires. I included a diagram to help with how to install one.
The idea came from: http://www.fordmuscle.com/archives/2...eyOn/index.php
Most people won't have access to the 2nd page with the wiring diagram. I am one of those people. So i've drawn one up for those of you who don't know much about electrical.
When you connect an item to one of the terminals, the ground must go to part of the frame, no need to run it all the way back to your battery, any good part of the frame will do. A good choice would be a bolt or screw that holds a bracket onto the frame.
If you have any more ?'s on it pm me & i'll try to edit the post to make it more helpful to keep this thread clean. Here is the original thread
https://mustangforums.com/m_2153436/tm.htm
 05-11-2007, 06:17 PM
#7
5th Gear Member

Join Date: Oct 2005
Location: Ohio USA
Posts: 4,616

they made two mistakes
1. not having that block bored over
2. stock block with two turbos.
a 9 or 10 second monster, is going to split this block in half
but i admire the fabrication skills
04-01-2008, 10:06 PM
#8
3rd Gear Member

Join Date: Nov 2007
Location: Orange County, CA
Posts: 614
<u>Alternator upgrade</u>
&&
<u>DIY 12V key on source</u>
I dont see a reason to cut wire terminals or plugs off if you dont have to or dont benefit from it.
I performed the alt upgrade on my 1991 it was the last thing I did before taking it out and it was totaled from behind. Well. I did it because I like to keep it clean, but now Im taking off my g*damn alt and wiring so the d*mn leaches at the insurance company dont get it... and can simply plug my stock unit back in because I did not destroy any wiring. Also I had wired up a +12v switched dist. block during the alt upgrade.
http://www.thatmetalbox.com/automotive/3g_alternator/
See pics, sorry they are not in order...
-------------------------------
Here is my passenger side distribution block, sprayed with battery terminal protector (I did a drivers side one too)
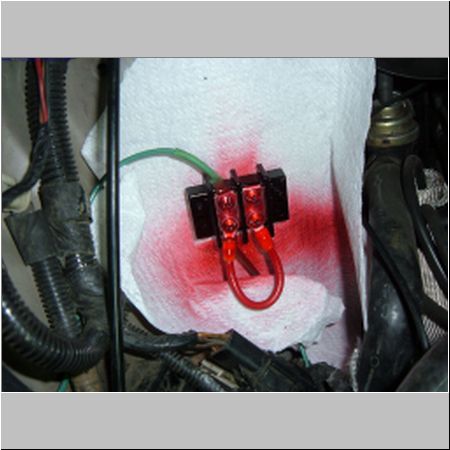
Here is how I mounted it: no drill holes, the fox engine compartment allows you to mount so many items in the myraid of factory holes
Here with the intake back on its hard to see
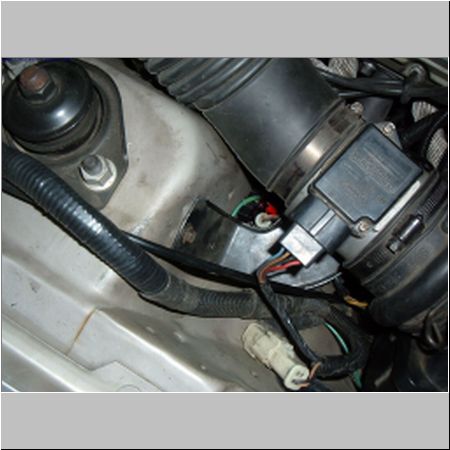
as the items I used take very very little current, I was not too worried on some items - but on the pass side I had one of these switched 12v going to a relay utilizing 12v direct from battery so I could pull some amps, anyway I used a spade to pull power out of the old harness from the plug I did NOT cut off the loom, here:
&&
<u>DIY 12V key on source</u>
I dont see a reason to cut wire terminals or plugs off if you dont have to or dont benefit from it.
I performed the alt upgrade on my 1991 it was the last thing I did before taking it out and it was totaled from behind. Well. I did it because I like to keep it clean, but now Im taking off my g*damn alt and wiring so the d*mn leaches at the insurance company dont get it... and can simply plug my stock unit back in because I did not destroy any wiring. Also I had wired up a +12v switched dist. block during the alt upgrade.
http://www.thatmetalbox.com/automotive/3g_alternator/
See pics, sorry they are not in order...
-------------------------------
Here is my passenger side distribution block, sprayed with battery terminal protector (I did a drivers side one too)
Here is how I mounted it: no drill holes, the fox engine compartment allows you to mount so many items in the myraid of factory holes
Here with the intake back on its hard to see
as the items I used take very very little current, I was not too worried on some items - but on the pass side I had one of these switched 12v going to a relay utilizing 12v direct from battery so I could pull some amps, anyway I used a spade to pull power out of the old harness from the plug I did NOT cut off the loom, here:

Thread
Thread Starter
Forum
Replies
Last Post