351C - pulling distributor to install new intake
 03-05-2011, 06:13 AM
#1
Thread Starter

Join Date: Nov 2009
Location: PA
Posts: 32
Hey gang, I am installing a new intake on my 1973 351C. I am gathering all advice before I start and noticed the directions tell me to pull the distributor. So I started scanning the forum for tips/ tricks. NOW I AM SCARED to pull the distributor! THANKS A MILLION! :-)
Really, if I am just going to pull the distributor, set the intake, put the distributor back in the same position (pointing in the same direction), should I run into a lot of issues? I can do a lot on the car but timming and electric are not strong.
Really, if I am just going to pull the distributor, set the intake, put the distributor back in the same position (pointing in the same direction), should I run into a lot of issues? I can do a lot on the car but timming and electric are not strong.
 03-05-2011, 06:49 AM
#2
6th Gear Member

Join Date: Oct 2006
Location: Cork, Ireland
Posts: 6,417
well start like that:
1. mark on the cap which post is going to spark plug #1. then verify the firing order. they should go on the distributor _anticlockwise_ in the following order 1-3-7-2-6-5-4-8
you can find the cylinder numberings here:
http://boxwrench.net/specs/ford_351C.htm
if that doesn't match up stop here and let us know.
2. turn your engine manually (clockwise using a socket at crank bolt) so that it's on TDC (the timing mark aligning with 0/TDC)
3. remove the cap and look where the rotor is pointing. It should point to the post that leads to #1 cylinder. if it does not (exactly 180 degrees away) then turn the engine at crank another 360 degrees. to TDC. latest then it should match up
if that doesn't match up stop here and let us know
4. now mark the distributors base. remember the rough directionn the vacuum canister is pointing. then use something like tipex at the base of the distributor. paint a line going from shaft to block so if you turn the distributor you know where it was originally.
5. with cap and spark plugs removed remember where the rotor is pointing. maybe make another small tipex mark at the outside of distributor where it's pointing to. then open the bolt that holds it in place and remove the bolt with the hold down plate and remove the two wires from distribuitor to coil at coil as well as the pluglead at coil.
6. this is the important bit: DO NOT PRY the distributor out. Turn the distributor. If you cannot turn the distributor housing at this stage let us know. don't force!!! if you cannot turn the housing at this stage the distributor is stuck in there. if it does not turn it will never come out. if that's the case let us know
when it turns then just keep pulling while rocking (turning the distributor). you should have the distributor in your hand then
from here on do NOT turn the engine at crank. block the hole with a rag so you don't have crap going in there.
when putting back in it's as simple as that. shove the distibutor in and when you push it down you will have to turn the rotor clockwise to help it a bit. you will have to make sure that the distributor is fully seated. you have to start with the rotor pointing too far in anticlockwise position as it will turn clockwise when pushing it in. it might be tricky to engage the oil pump at bottom of shaft try, turn rotor, try again.
The distributor has to be fully seated and the rotor pointing to the mark you made with the housing turned to the first mark you made at base. only if that's the case and fully seated bolt it down. reconnect to what it was. if usure. #1 cylinder goes to post where rotor points to and the others anticlockwise in firing order.
Last edited by kalli; 03-05-2011 at 06:51 AM.
03-05-2011, 08:55 AM
#3
3rd Gear Member
Join Date: Aug 2010
Location: tn
Posts: 889
i agree w/ kalli.
make sure engine does not turn during the operation.
mark housing to block.
i cut a card into a pointer, tape to rotor, bend 90*, mark housing where pointer touches. while pulling dist out i mark rotor vs housing again so i know where gears start to mesh.
if the oil pump shaft does not have retaining washer (it should) then the pump shaft can drop into oil pan (if unlucky).
i always finish by confirming total advance w/ timing light.
03-05-2011, 11:29 AM
#4
Thread Starter
Join Date: Nov 2009
Location: PA
Posts: 32
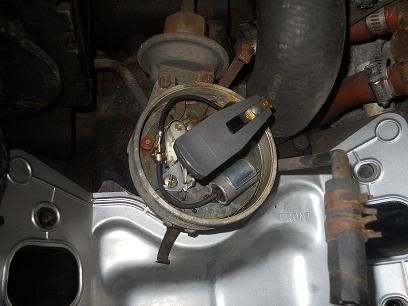
Because I am new to this I need to ask this question. Why does it need to be at TDC? If I mark it where it is, can't I just put it back the same way? In the meantime I will turn the engine to TDC and move on to the next step. THANK YOU GUYS! I am takin gthis slow and making sure I do it right. So expect a lot of questions and pictures.
This is what it looks like currently.
This is what it looks like currently.
Last edited by bailer01; 03-05-2011 at 11:36 AM.
03-05-2011, 11:39 AM
#5
6th Gear Member
Join Date: Oct 2006
Location: Cork, Ireland
Posts: 6,417
yes, you can mark everything, pull it out and shove it back in. However if you forgot to mark something or you turn the engine it won't run. or very badly. further, if something doesn't work you have to go back to TDC and start from there. So why not do that in the first place ;-)
most important for this is though that you can _verify_ before you start. whenever something doesn't match up let us know. you know something stupid like a incorretc balancer and you'll never get it right. i simply want to crosscheck everything. if engine is at TDC and rotor points to #1 then i know your timing marks are correct and you started with engine turned to TDC at compression stroke.
for me it's just habbit. If a friend pulls a distributor and I have to put it in and he didn't turn the engine to TDC there will be a lot of slapping going on :-) if he does and crosschecks I know everything was correct before i started
03-05-2011, 07:58 PM
#10
3rd Gear Member
Join Date: Aug 2010
Location: tn
Posts: 889
in most cases you gain upper range performance as the carb is raised above intake due to increased plenum volume and increased straight run.
usually best to sit carb as high as possible while maintaining sufficient hood clearance.
sometimes 4 hole spacers are better. sometimes it's better to uncouple dual plane chambers. good for spacer to have low coefficient of friction. sometimes best to use insulating spacer.
can use clay to check hood clearance.

Thread
Thread Starter
Forum
Replies
Last Post